Intervention for Choking in an Unconscious Dog: XXT – eXternal eXtraction Technique
Current treatment for choking (airway obstruction) in dogs includes performing the Heimlich maneuver (abdominal thrusts), removal with forceps, performing a finger sweep (in an unconscious patient), or rescue breathing. Advanced airway techniques (surgical cricothyrotomy) may be an option in a veterinary clinic, or with adequate prehospital training in the field.
The eXternal eXtraction Technique™ (XXT™) is a safer, more effective treatment/intervention for choking in an unconscious dog. The authors do not have experiential evidence using this technique in cats.
Although true choking (complete airway obstruction) has been considered uncommon, the authors are aware of many reported cases of fatal airway obstructions during training or play sessions. There are also reports of pet owners suffering injuries including finger amputations attempting to retrieve an object from the back of a dog’s throat. Working dogs are particularly high risk due to their high drive and intense focus on rewards.
Prevention
Choking on a ball or similar object may be avoided by adequate safety precautions. The size and shape of toys and ball rewards should be evaluated before offering them to your pet. Balls and Kongs should be checked for damage, cracks, etc. Supervision is recommended for balls, Kongs, and chews.
Click on the image below to see the video procedure.
XXT™ PullGrip Alternative
It is valuable to know that there is also an alternate approach to the eXternal eXtraction technique. The PullGrip approach should not be used unless the dog can be placed in a stabilized position with its head in an “In-Line Position” with the airway parallel to the floor -- nose, ears, and spine all in a line. This alternate technique may be more effective for responders with reduced thumb strength.
Indications
- Full airway obstruction AND
- Ball or similarly shaped hazard AND
- Unconscious patient
- Except for very passive dogs as safety dictates
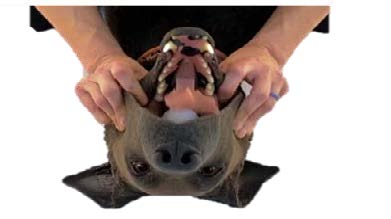
Step 1: Starting Body Position
A. "Brace the Back" against the floor and straddle the dog in a supine position.
- Adjust based on the size of the dog.
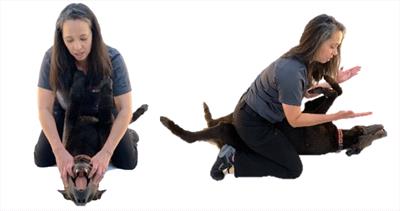
B. Position the head in "In-Line Position" with the airway parallel to the floor.
- Nose, ears, spine, all in a line
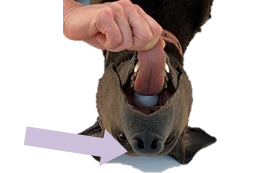
Step 2: Identify Landmarks
A. Feel the ball.
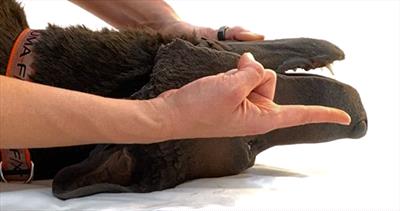
Step 3: Starting Hand Position: Open Diamond
A. Thumbs
- Placed on both sides of the trachea, below the ball.
- Note the gap between the thumbs.
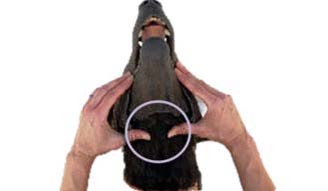
B. Middle Fingers
- Pushing into the 'V' notch to help open the jaw.
C. Index Fingers
- Grip using the lip/cheek to protect fingers.
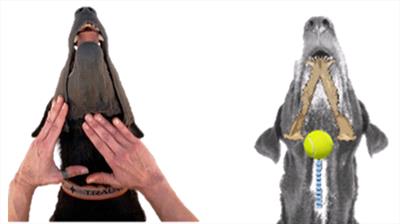
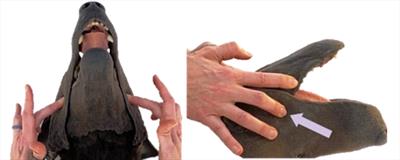
Step 4: PUSH HARD!!
J-Stroke
- Push with locked-out arms and full body strength, down and out against the ball, opening the jaw so that the ball ejects out of the mouth.
Step 5: If breathing does not return spontaneously, provide 2 mouth-to-snout rescue breaths.
Step 6: If the patient does not respond, begin CPR.
Step 7: Seek veterinary care immediately.
Indications
- Full airway obstruction AND
- Ball or similarly shaped hazard AND
- Unconscious patient
- Except for very passive dogs as safety dictates
Step 1: Starting Body Position
A. If possible, have an assistant stabilize the dog on their back. The responder will position themselves in front of the dog facing their snout.
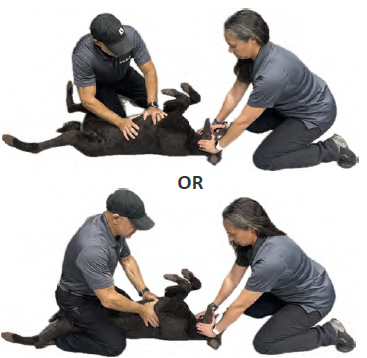
B. Position the head in "In-Line Position" with the airway parallel to the floor.
- Nose, ears, spine, all in a line
Step 2: Identify Landmarks
A. Feel the ball.

Step 3: Starting Hand Position: Open Diamond
A. Thumbs
- Grip using the lip/cheek to protect the thumbs, opening the lower jaw vertically.
B. Fingers
- Placed on both sides of the trachea, below the ball.
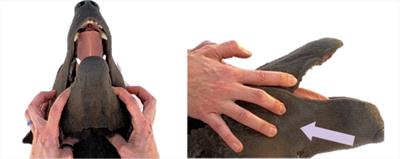
Step 4: PULL HARD!!
J-Stroke
- Pull your fingers against the ball, pressing down and out through the open mouth.

Step 5: If breathing does not return spontaneously, provide 2 mouth-to-snout rescue breaths
Step 6: If the patient does not respond, begin CPR.
Step 7: Seek veterinary care immediately.